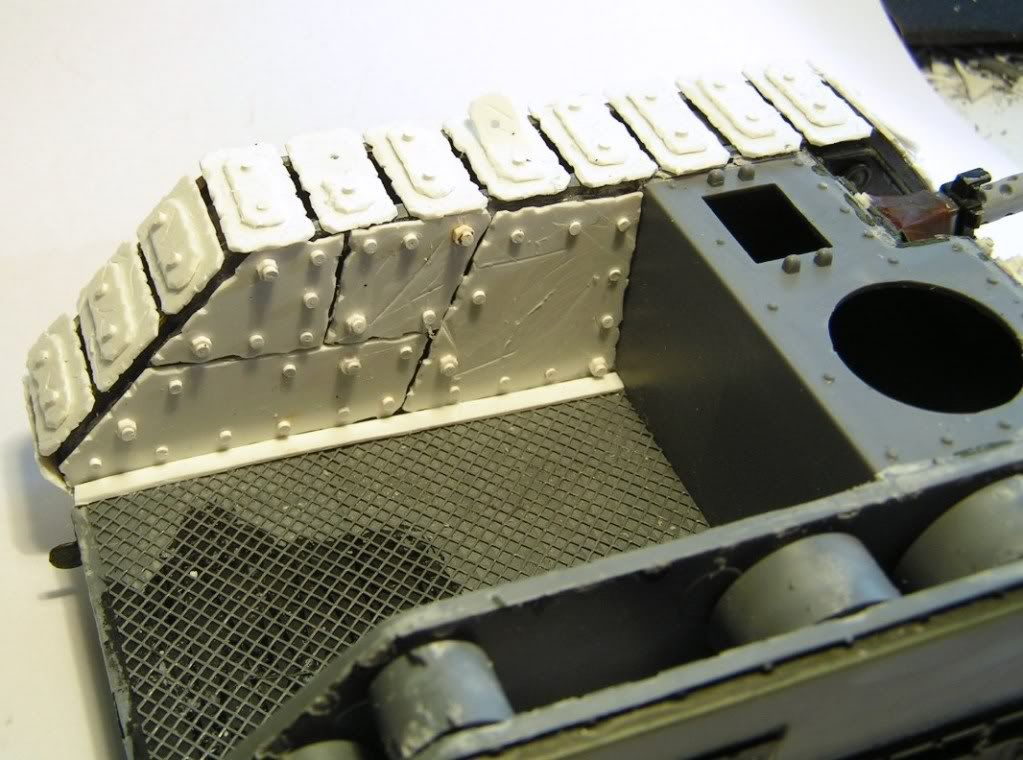
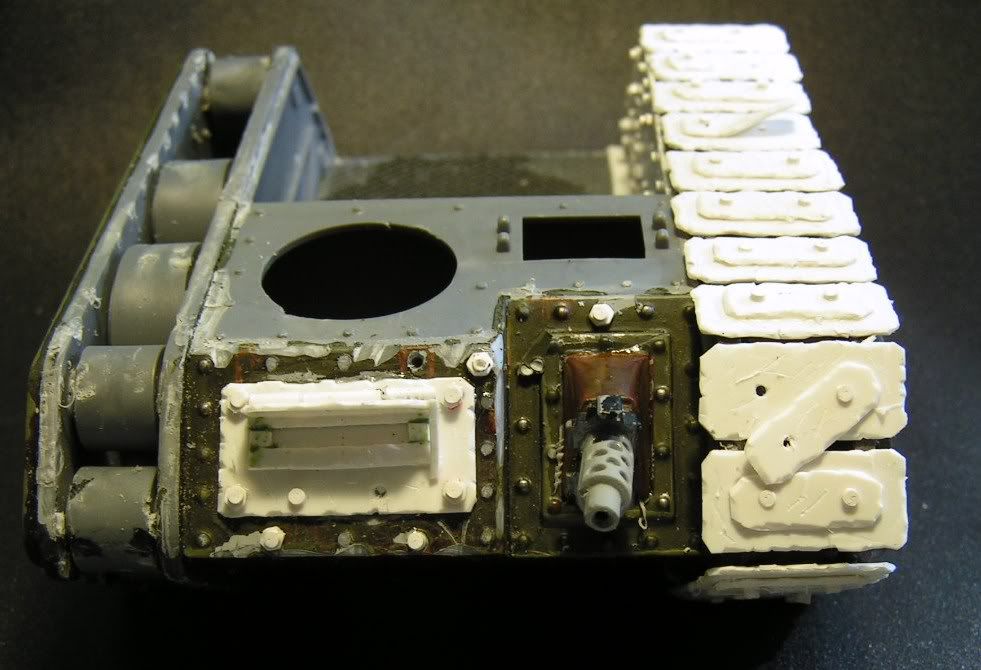
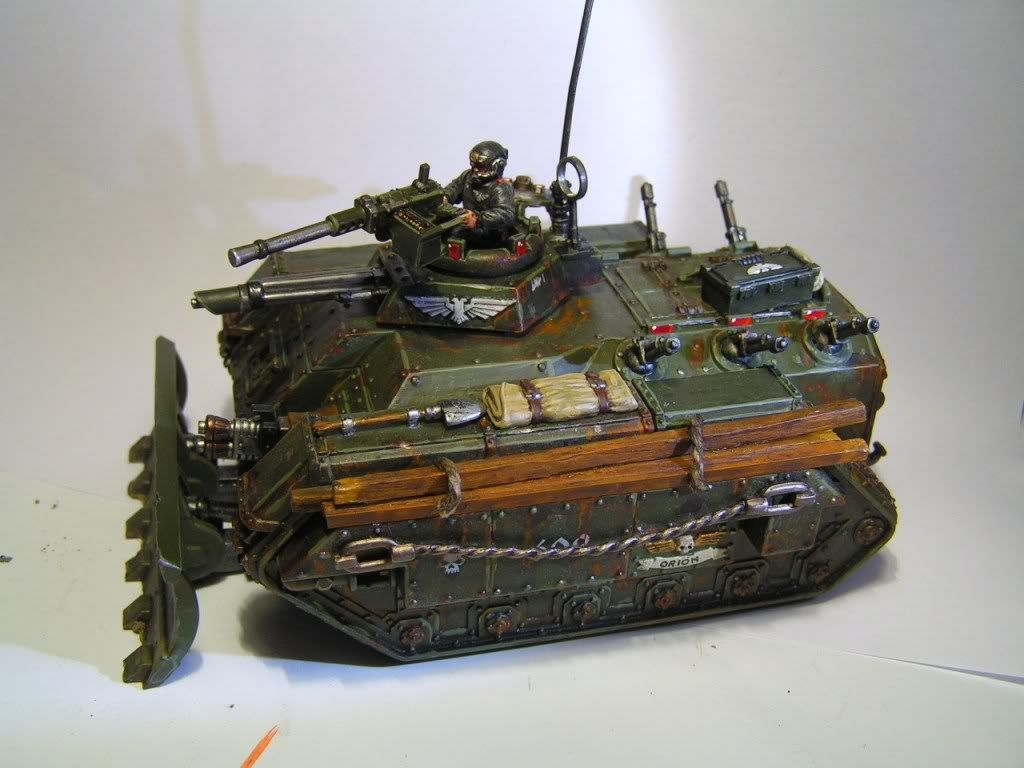
I'm still having a lot of fun with my Looted Chimera. I have started work on the tracks and although they're not finished yet I thought I might show you where things are going with this project.I took the original tracks off because I think they are to flimsey and clean for an Ork Tank. That did mean however that I would have to make my own.
As you can see in the picture I did some bodywork on the inside and I like how it looks so I will probably keep that going for the rest of the interior.I glued a piece of fly netting on the floor so After I paint that it will look pretty cool.
But I also started on the tracks. It's quite a tedious job cutting all those tracks and then scarring them but I think I'm heading in the right direction. I want to make them more Orky by adding some sort of spikes to them but I'm not sure how to do that yet.I'll have to think about it for a bit. I will go and bend some corners of some tracks. They're scratched and scarred but I think they should look even more damaged.
The front of the Chimera saw some work too. I made a hull mounted machine gun from an old Sentinel exhaust and made my own vision slits for the driver. I want to make it so the driver pops his head out on top so the vision slit is just for show and to break up the clean front.
Related articles:
Looted Wagon part 1: taking the original painted Chimera apart
Looted Wagon part 2: working on the Reinforced Ram
Seb
Showing posts with label conversion. Show all posts
13/04/2011
12/04/2011
Looted Wagon part 2
After taking my Imperial Guard Chimera apart it's now time to start building my looted wagon.
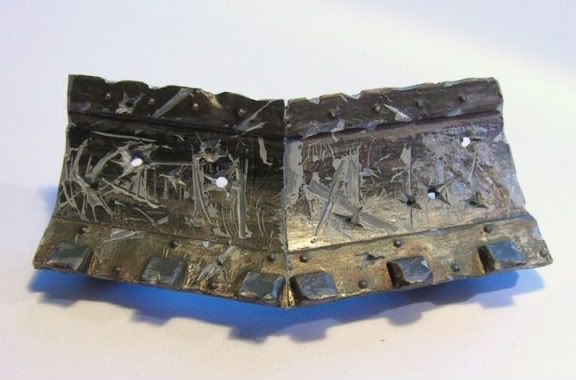
One of the things that I want to make is a Reinforced Ram. The IG Chimera comes with a nice straight dozer blade that I want to use. Of course this doesn't look Orky enough as it is so I got my hobby knife out and cut a "v"shape out of the middle and when I put the two bits back together the dozer blade is no longer straight but it's shaped in a point.(see pic) a bit like a snow plow or like the front bit on an old locomotive
I also added a lot of scratches and bullet holes to it and when that was done I added some sharpened "I"beams and some extra plates to it as if it was repaired a bit. I will add some razor wire to it when I have painted it. It's to hard to add that now and then paint it. It now looks "proppa"
Related articles: Looted Wagon part 1
Seb
One of the things that I want to make is a Reinforced Ram. The IG Chimera comes with a nice straight dozer blade that I want to use. Of course this doesn't look Orky enough as it is so I got my hobby knife out and cut a "v"shape out of the middle and when I put the two bits back together the dozer blade is no longer straight but it's shaped in a point.(see pic) a bit like a snow plow or like the front bit on an old locomotive
I also added a lot of scratches and bullet holes to it and when that was done I added some sharpened "I"beams and some extra plates to it as if it was repaired a bit. I will add some razor wire to it when I have painted it. It's to hard to add that now and then paint it. It now looks "proppa"
Related articles: Looted Wagon part 1
Seb
Labels:
40k,
chimera,
conversion,
looted wagon,
Orks
10/04/2011
Looted Wagon part 1
One of the reasons to start an Ork force is that you can loot stuff and make it all Orky. There really are no rules and you are only bound by your own imagination. The more wacky it looks the more people will say it's a "proppa" Ork build.
It was certainly one of the things that made me want to do an Ork army!
So what does one need for a looted wagon build? -well, any vehicle you can get your hands on, 40k or any other brand then a lot of plastic card and green stuff and you're good to go.
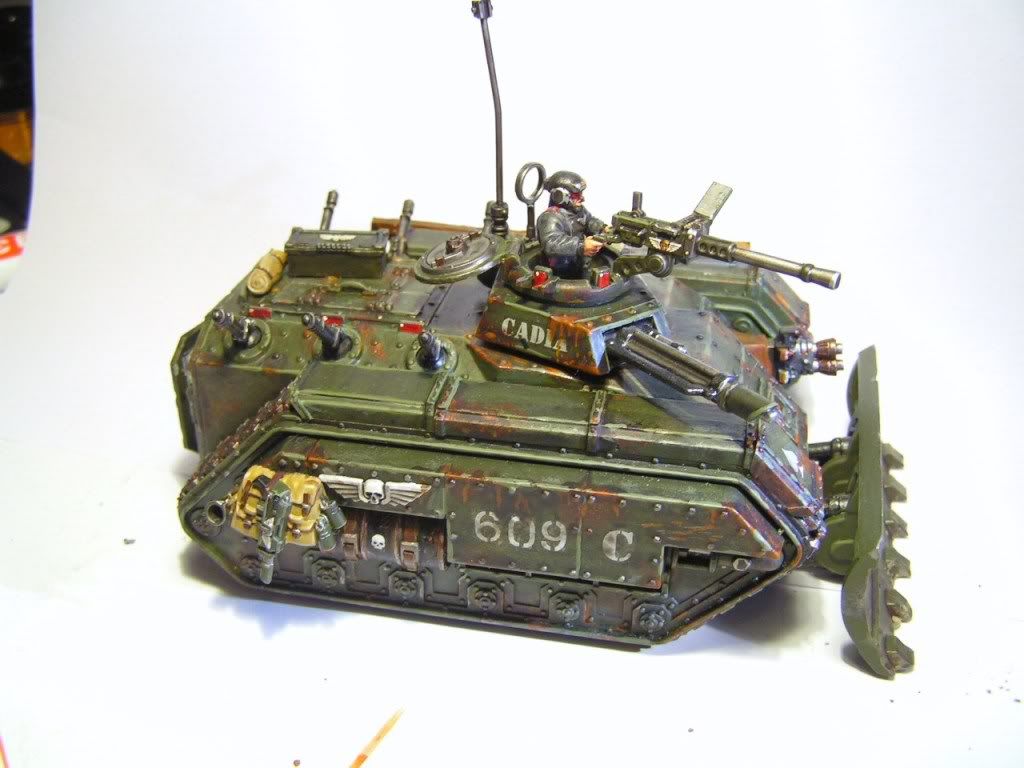
So what do I have to "Loot"? I have a small collection of Imperial Guard models from when I started painting GW stuff some 3 years ago. My very first vehicle was a chimera and I really went to town on it painting a lot of rust and battle damage. When I look at the Chimera now I can only think of two things, 1> my painting has improved a bit, and 2> that would make a great Looted wagon.
So some quick pictures before I get my hobby knife and hack saw out:
And then "Start lootin them Bitz boss!!!"
I guess there's no way back now....
Seb
It was certainly one of the things that made me want to do an Ork army!
So what does one need for a looted wagon build? -well, any vehicle you can get your hands on, 40k or any other brand then a lot of plastic card and green stuff and you're good to go.
So what do I have to "Loot"? I have a small collection of Imperial Guard models from when I started painting GW stuff some 3 years ago. My very first vehicle was a chimera and I really went to town on it painting a lot of rust and battle damage. When I look at the Chimera now I can only think of two things, 1> my painting has improved a bit, and 2> that would make a great Looted wagon.
So some quick pictures before I get my hobby knife and hack saw out:
| Click to enlarge |
| Click to enlarge |
And then "Start lootin them Bitz boss!!!"
| Consider this looted! |
Seb
Labels:
40k,
chimera,
conversion,
looted wagon,
Orks
06/04/2011
Ork Warboss Skrapsmacka
![]() |
| AoBR Ork Warboss |
I think the conversion of the chainsaw in the Powerklaw worked really well. I also added a chainsaw blade to the gun to make it more menacing.
I think he will look like a Proppa Boss in my Ork army, what do you think? let me know in the comments below.
Labels:
40k,
AoBR,
battle dammage,
conversion,
Orks,
painting showcase,
scratches,
Warboss
27/03/2011
AoBR Warboss and Nobz
I'm scouring the interwebs to build my Ork army El Cheapo and I found someone selling the AoBR Nobz and Warboss for about $15,-. A steal and a great addition to my small Ork force.
I got them in the mail on Friday so after work I opened up the package. They were all cut from the sprue but all complete, The Assault on Black Reach set is made so you can basicly model the mini's in one single way. They don't come with a lot of extra bits and weapons but I still have some left over from my other Ork Nobz so I wanted to see if I could use them.
So here's what they look like straight from the box:
I got them in the mail on Friday so after work I opened up the package. They were all cut from the sprue but all complete, The Assault on Black Reach set is made so you can basicly model the mini's in one single way. They don't come with a lot of extra bits and weapons but I still have some left over from my other Ork Nobz so I wanted to see if I could use them.
So here's what they look like straight from the box:
But after only two hours this is what they look like now:
| AoBR Warboss and Nobz converted |
I must say that most small conversions were straight forward swaps but I did have to cut some limbs in order to make it all fit. The only two things I changed on the warboss is his powerklaw and he now has a chainsaw attached to his gun. The nobz required some more work by giving two of them Powerklaws and other weapons but I also buffed them up a bit with extra armour plates and shoulderpads. Right now I still need to remove the moldlines(I hate that) and assemble them because now they are just bluetacked together, then theyll be ready for the undercoat and they'll look much better after that.
The AoBR Nobz looked smaller and with less detail then the Nobz I already have but like this they blend in very well I think. Oh' and ofcourse most time went in creating the bases again. More info on that in my topic on Trashy Ork Bases.
Seb
|
31/01/2011
Adding a bit of value to your models.
Plastic models are the way forward and GW is bringing out more and more plastics. This way they can keep the costs of producing lower then with metal models and for us it makes it easier to convert models. The amount of detail is getting better and better with plastics but it has one drawback, plastic models are very lightweight. They have the tendency of boouncing to the other end of the room when you drop them.
But there's an easy sollution for that. I stick a 5cents euro coin in the bases to weigh them down a bit and it works really well. Models don't get knocked over on the table and stay in their place nice and sturdy. I imagine that every currency has a coin with the size of a base so if you're not in the euro zone you might have to have a look wich coin fits. This way you also add a little value to the models. A unit of 10 models costs me €0,50 so that's not much .
But why stop there? I also magnatize all my bases. I started doing this with my fantasy army as they have to be placed on movement trays. so when you magnatize the bases and get a metal sheet and cut that to the size of your unit they will never fall of and you can easily move them araound on the table.
But why do this with 40K models then,.. well you can put your models on any metal tray for easy transport. the models will stick to the tray even if you turn the tray upside down. I have seen DIY cases that fit metal serving trays and have magnetized units on them.Also you can imagine that when you attend a tournament and have to move between tables a lot that it's very easy if you have one or two of these trays and you don't have to worry about people bumping into you when you make your way through the crowded room with your precious painted models.
I take a pen and draw the outline of the bases on a magnetsheet and cut them out with a pair of scissors. These magnetsheets are available at the better hobbystores and some DIY stores. Internet is your friend to locate them.
I then superglue the cut out magnets to the bases.It's better if the magnet is a little bigger then the bases. Because once they are glued properly you can take a knive and cut away the excess.
Once the magnet fits perfectly I paint the sides of the base and you can hardly see the magnetsheet underneath.
If you want to see the whole gretchin unit with magnets then click here.
But there's an easy sollution for that. I stick a 5cents euro coin in the bases to weigh them down a bit and it works really well. Models don't get knocked over on the table and stay in their place nice and sturdy. I imagine that every currency has a coin with the size of a base so if you're not in the euro zone you might have to have a look wich coin fits. This way you also add a little value to the models. A unit of 10 models costs me €0,50 so that's not much .
But why stop there? I also magnatize all my bases. I started doing this with my fantasy army as they have to be placed on movement trays. so when you magnatize the bases and get a metal sheet and cut that to the size of your unit they will never fall of and you can easily move them araound on the table.
But why do this with 40K models then,.. well you can put your models on any metal tray for easy transport. the models will stick to the tray even if you turn the tray upside down. I have seen DIY cases that fit metal serving trays and have magnetized units on them.Also you can imagine that when you attend a tournament and have to move between tables a lot that it's very easy if you have one or two of these trays and you don't have to worry about people bumping into you when you make your way through the crowded room with your precious painted models.
I take a pen and draw the outline of the bases on a magnetsheet and cut them out with a pair of scissors. These magnetsheets are available at the better hobbystores and some DIY stores. Internet is your friend to locate them.
I then superglue the cut out magnets to the bases.It's better if the magnet is a little bigger then the bases. Because once they are glued properly you can take a knive and cut away the excess.
Once the magnet fits perfectly I paint the sides of the base and you can hardly see the magnetsheet underneath.
If you want to see the whole gretchin unit with magnets then click here.
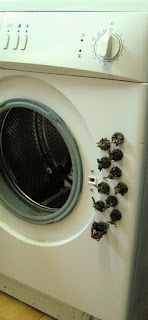
And then there's one more good reason to do this....
| Waaagh! |
How else would you mount that vertical assault on the washing machine to claim that unreachable objective on top of it.
Seb
Labels:
40k,
conversion,
Gretchin,
tutorial
04/01/2011
Heavy Bolter Conversion
![]() |
| Click to enlarge |
I wanted to make the space marine with the heavy bolter in my devastator sqd look a bit more "badass" so I had a look in my bitzbox and found some bits from the Imperial Guard Heavy Weapons Team.With very little conversion this marine now looks as if he is ready to unleash a storm of bullets upon the enemy.
![]() |
| Click to enlarge |
Seb
Labels:
40k,
conversion,
devastator,
Heavy Bolter,
space marines
Subscribe to:
Posts (Atom)