Showing posts with label tutorial. Show all posts

04/07/2016

Modifying laser cut MDF scenery


Sarissa precision MDF modified
I love using laser cut MDF buildings. They are relatively cheap, easy to build and plenty to chose from. When I build my WW2 French Normandy table I used 6 4Ground building but more about those at the bottom of this page, this is the zangali blog remember.

For Zangali I have thus far only used Sarissa Precision buildings. I'm using the "Far East" buildings. I have 2 houses, a watch tower and a small radar station. The laser cut buildings come quite plain and are unpainted but they are a nice base to start off with. 


First I add some sand to the bases and then paint all the buildings in various brown tones. You can be a bit messy at this stage, it will even make it more realistic. Once the paint is dry I used some shades of ink and washed the whole model. You can lengthen your ink with a bit of water. Once that was dry I dry brushed the whole thing with some light brown / grey paints. Of course I also painted the base with the same colors as I used for my gaming table to match it. That was basically all the painting I did.
To the tower I made some major changes. I didn't really liked the walls of the original so I cut those out and green stuffed some sand bags. I also painted up a bit of bandage in some camo colors and torn the bottom off to make it look ragged.
All the roofs in this far east set are quite plain and simple and look a bit off to me so I bought a bamboo sweeper at the local pound store and cut some of the bristles off and used that for the roofing. You can see it makes a big difference. If I would do it again I would make it look more like two small layers instead of one big one but hey...


This building has just been re-roofed and painted, nothing major but it makes a big difference


At the start of this article I also said I have used 4Ground buildings in an earlier project and even though it has nothing to do with the Zangali project I do want to show you them here as it is just another example of how you can add your own creativity to a pre painted building. 

4Ground French Garage
The problem I had with the 4ground buildings is that they look really polished, plain and all look the same. Also if you put them on a grass matt like most of us do they look out of place and usually don't fit in with the gaming table.
To tackle those things I did a couple of things. First of all I googled for tiled flooring, carpets and wallpapers, just printed them on paper and glued them inside the rooms. They all look different now but not from the outside so I added some climbing plants to the walls and again printed some posters and such. I didn't go for the war propaganda posters that you often see but tried to make it look like a normal small French country village with a cafe, Garage and a bombed house (although the bomb just missed the house 


The whole thing is on a MDF base, the cobble stones are just textured wall paper and then painted and washed. I added a little shed made of coffee stirring sticks some walls, 2 gas pumps from my son's old garage set and some lose bits and pieces that fit in this setting. And YES, that is Mater from Cars. everybody always asks me that. I did repaint and changed him a bit but somehow he is still recognisable.


For this destroyed house I just put the whole thing on a MDF base again. The wall paper cobble stone is also the same and blends in with my road sections of the gaming table. I just used a Games Workshop crater to create the impact point just next to the building. Even though it missed the following explosion still destroyed most of the house. A direct hit would have destroyed it completely. With all the lose debris sprinkled loosely on the base it creates the feeling of total destruction a a heavy bomb


4Ground destroyed detached house

4Ground French Cafe
And lastly no French village can do without a Café. I can just envision René Artois from "allo allo" there going round with some drinks while planning how to get his hands on the fallen Madonna with the big boobies.
I think you get the idea now of how I made this. I must say that the chairs are from 4Ground also but the tables are made by me.
The last tip I have really is that I flocked the edges of the MDF bases with the same flock as my gaming table so the buildings blend in perfectly


4Ground French Cafe
4Ground French Cafe

Here's a shot of the Normandy table in action:
4Ground Normandy gaming table

Cheers,
Seb

15/06/2016

Making Jungle Terrain Tutorial

28mm jungle terrain

When you're making a Jungle themed gaming table it's nice to have some actual jungle pieces. In this topic I'll cover how I make my jungle pieces. I hope to show you how I do it so you can copy this or you can change them to fit your jungle table. I like my jungle to be modular so I can have different set-ups with every time I set up the gaming table.

Cutting the shapes from MDF
Step 1: Get a sheet of 4mm thick MDF and mark out some organic shapes with a marker. Before I drew the shapes I measured out area's of 3"x3", 6"x3", 9"x3" and 6"x6" and drew the shapes in there. You can see it on the picture below. (ignore left side of the picture, those will become mountains and hills for a later tutorial).

Step 2: Cut out the shapes from the MDF Sheet with a jigsaw and cut the sharp edges with a hobby knife. Then sand them down so you get smooth and curved edges.


Tree bark ready for the oven
Step 3: You might want to add some rocks to your jungle.You can get bags of tree bark from the garden store. They are pretty cheap and a large bag will last you a lifetime. Funnily enough the tree bark will look more realistic then using actual rocks and will keep it light in weight. The tree bark is still a bit moist when you take them out of the bag. You can leave them out of the bag for a couple of days to let them dry but I heated up the oven and then put the tree bark in the oven on a baking tray with the oven turned off. The heated oven will dry the tree bark in about half an hour.


Tree bark scrub down!
Step 4: When the tree bark is dry I take a stiff toothbrush and start scrubbing the tree bark. Lots of dust and small bits will come of and the edges will get that realistic rock like appearance. This also prevents the rocks from chipping later on when you have painted them.


Hot glue gun is...HOT!!!
Step 5: Take a hot glue gun and glue the pieces of tree bark down on the bases. Try to work as neat as possible and watch out, hot gue gun is...hot. I got some minor burns from the hot glue dripping from the gun. But if you want good looking scenery some second degree burns are a small price to pay.


Seal the tree bark
Step 6: This is a very important step which should not be skipped. Take some PVA glue and water it down with about 40% water. Now take a brush and coat all the bits of tree bark with a generous splash of the watered down PVA mix. The dry tree bark will soak up the mix and it will make it stronger, prevent it from chipping and makes it easier to paint later on because the tree bark will not soak up your paint. I water the PVA down because the tree bark will soak it up a bit easier but also because you will keep the most detail like this instead of with pure PVA glue.


 disco dip, nuts or sand sir?
Step 7: When the PVA mix on the tree bark is dry we can start to add sand to the bases. I coated the topside of the bases with pure PVA glue and then dumped them into a bucket of sand. Make sure the sand sticks to all the areas and no white parts are showing. Shake off the excess sand and leave them to dry. Also make sure no sand is glued to the underside.


Step 8: It's time to get the jungle bases painted up and plant the trees and plants. When you are making a complete jungle table I suggest using the same color for the jungle terrain pieces as you're using for the gaming table. This will make sure your scenery blends into the table seamlessly. When you do this it's a good idea to go to your local DYI shop and buy a can of cheap matte paint in the desired colour. I bought a can of a sort of light beige sandy colour. You can also do this for your rocks, hills and mountains just make sure you buy a water based paint because it will dry faster, smells less and will not melt any polystyrene you might use in your scenery pieces.


Paint the rocks first. easier that way.
Step 9: Now paint up the rocks with your desired colour. Once dry also wash the rocks and drybrush with the original colour. Now with the rocks you want to create a bit more depth and contrast so use lighter colours and drybrush at least two more times. I used a grey'ish/ brown color and drybrushed it with Vallejo Brown Sand , then Vallejo Iraqui Sand and last Vallejo Ivory. 


Washing the jungle bases
Step 10: Make a wash of a brownish colour, for scenery pieces I just pick a colour I want to use and then add a load of water to it to thin it creating a cheap and easy wash. For scenery pieces like these it's not really rocket science. When the wash is dry I drybrush the pieces with the original colour to create a bit of depth.


Starting to look like a jungle
Step 11: Now the painting is done and dry it's time to get creative with some plastic (aquarium) plants and model trees and foliage. A cheap and good place to buy these is Ebay where you can get quite a variety. Start with the larger pieces and work to smaller pieces. Just place them in a irregular pattern. I use a hot glue gun and super glue for this.


 Step 12: Some plastic plants might look a bit too much like toy trees. Ad some different colours of green and brown with an airbrush if you have one but you can also use a drybrush technique to create depth. I also removed most of the obvious moldlines and flash but this can be a bit of a tedious job... I finish this step by spraying some matte varnish over the plants and trees to take of the plastic/shiny look. Unfortunately I don't have a picture of this to show you the difference but if you compare the picture from the last step with the picture from the next step you will see I have painted the palm trees up, added some green variety to the plain green leaves and gave it a matte coat of varnish to take the shine off.


Painted and matte coated
Step 13: Now it's time to add the last bit to your jungle bases. I have added some small green flock here and there and for the fallen leaf effect I used a kitchen mix of Italian herbs. Very cheap and you can get a lot of different kinds. At first it is kind of smelly but that will go after about a week. I have also added some grass tufts. I have bought these from Gamers Grass, great service, good product and good variety of colors, shapes and sizes. I mix up the tufts and then I'm done. ready to use on your gaming table.


Jungle base done

With some figures for reference

17/01/2014

Bolt Action British camo tutorial

For everyone who hasn't thought of the obvious way to paint British camo like on the warlord box art here's a quick and dirty tutorial.
Undercoat your model in black and add those nifty small stickers from your office supplies and spray/airbrush/light brush over with green color.


Then paint up your shading, high lighting and details and your done. looks nice with a matt finish and some pigments.


Here's a step by step guide.


Bolt Action Daimler Armored car just primed in black

Added some small stickers

Airbrushed the green color on the model and then removed the stickers

All done
Cheers,
Seb

12/01/2014

Magnetizing your Bolt Action soldiers

Here's how I do it.


Step 1: glue model on it's plastic base.
Step 2: glue model's base on a metal washer (mine are 2,5mm thick)
Step 3: put a little ball of greenstuff in the center hole of the washer...
step 4: put little drop of super glue on the greenstuff
Step 5: press a 2x5mm rare earth magnet in the ball of greenstuf
Step 6: Press down model on flat surface. the magnet sinks in the greenstuff and is level with the surface.
Step 7: put it away for a few hours to set and cure.
(for metal models I use 2 magnets)

Done!


Pro's:
-Plastic models carry a bit more weight and are nicer to handle
-Models stay upright and don't tip over due to the weight and low point of gravity.
-You can put them on a metal tray and they will never fall of, this is especially handy at tournaments because you just put them on a tray and don't have to worry about bumping into anyone and that you models fall on the floor. (see picture)


Con's:
-time investment during assembly
 -Models are 2,5mm taller

Pictures:
In the last picture you can see I hold the tray at a near 90 degree angle. (tray with metal sheet but a metal tray works even better) I can flip the tray over 180 degrees and the models still stick. Even metal figures like the heavy British para medic at the left front. (2models on 1 base)

31/01/2011

Adding a bit of value to your models.

Plastic models are the way forward and GW is bringing out more and more plastics. This way they can keep the costs of producing lower then with metal models and for us it makes it easier to convert models. The amount of detail is getting better and better with plastics but it has one drawback, plastic models are very lightweight. They have the tendency of boouncing to the other end of the room when you drop them.
But there's an easy sollution for that. I stick a 5cents euro coin in the bases to weigh them down a bit and it works really well. Models don't get knocked over on the table and stay in their place nice and sturdy. I imagine that every currency has a coin with the size of a base so if you're not in the euro zone you might have to have a look wich coin fits. This way you also add a little value to the models. A unit of 10 models costs me €0,50 so that's not much .

But why stop there? I also magnatize all my bases. I started doing this with my fantasy army as they have to be placed on movement trays. so when you magnatize the bases and get a metal sheet and cut that to the size of your unit they will never fall of and you can easily move them araound on the table.
But why do this with 40K models then,.. well you can put your models on any metal tray for easy transport. the models will stick to the tray even if you turn the tray upside down. I have seen DIY cases that fit metal serving trays and have magnetized units on them.Also you can imagine that when you attend a tournament and have to move between tables a lot that it's very easy if you have one or two of these trays and you don't have to worry about people bumping into you when you make your way through the crowded room with your precious painted models.
I take a pen and draw the outline of the bases on a magnetsheet and cut them out with a pair of scissors. These magnetsheets are available at the better hobbystores and some DIY stores. Internet is your friend to locate them.
I then superglue the cut out magnets to the bases.It's better if the magnet is a little bigger then the bases. Because once they are glued properly you can take a knive and cut away the excess.
Once the magnet fits perfectly I paint the sides of the base and you can hardly see the magnetsheet underneath.

If you want to see the whole gretchin unit with magnets then click here.
And then there's one more good reason to do this....


Waaagh!

How else would you mount that vertical assault on the washing machine to claim that unreachable objective on top of it.

Seb
30/12/2010

Painting battle damage

Here's the Step by Step guide on how to paint battle damage.

I picked an assault marine because I gave it a yellow powerfist and it’s easier to take clear pictures of that rather then of the catachan green I use a lot on my chapter.
These are the colors I used:

Catachan green
Camo green
Golden yellow
Sunburst yellow
Tin bitz
Shining gold
Burnished gold
Boltgun metal
Mithril silver
Chaos black
Fortress grey
Badab black
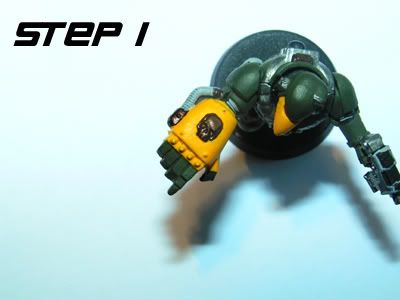
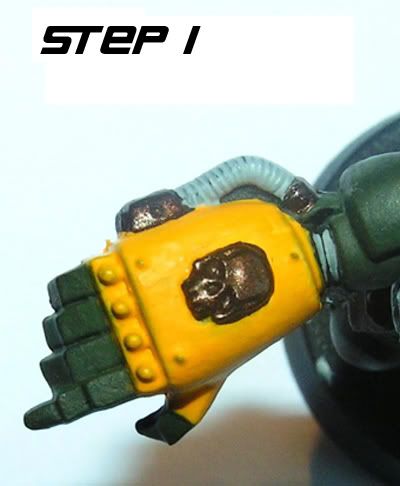
Step 1. Basepainting
This is what I call Basepainting, I paint the model in the basic colors of my chapter. If you take your time you can paint up the model nice and smooth. Make sure your paint is watered down a bit because it paints nicer and easier and looks a lot better. No one likes a lumpy model unless its nurgle.
The base colors I use are
Fingers and arm: Catachan green
Hand : Sunburst yellow
Skull: Tinbitz
Hose: Fortress Grey
We will just concentrate on the powerfist so I only describe what I do Step by Step on that leaving out the rest of the model.


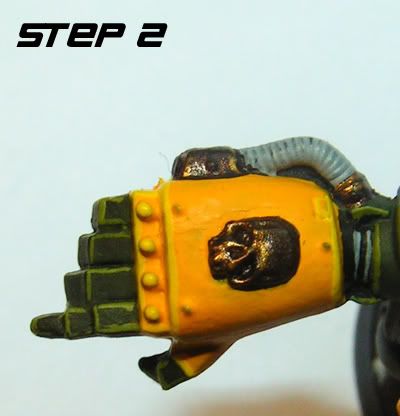
Step 2. Edging
When you want to give your model a bit of depth the easiest way to do so is by edging it. Just paint really fine lines along the edges in a lighter color then the original base color.
I used:
Fingers: Camo green
Hand: Sunburst yellow
Skull and hoseconnectors Shining gold
Thin down your paints again and lightly edge the model. The skull was done with very watered down shining gold on the raised parts only.


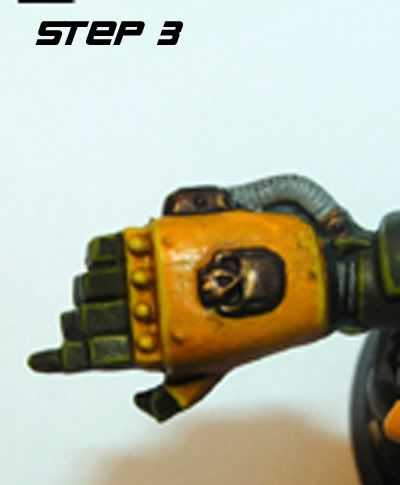
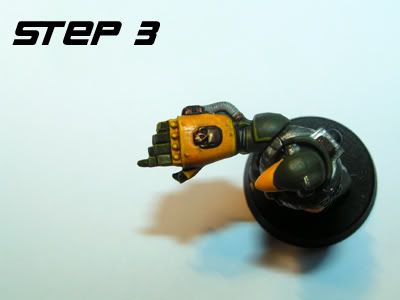
Step 3. Washing
Next I washed the complete Powerfist with watered down badab black (1:1) . This will give the model even more depth and creates the illusion of shadow. There’s nothing to it, just wash it and make sure it doesn’t pool. Don’t over do it and you’re good.


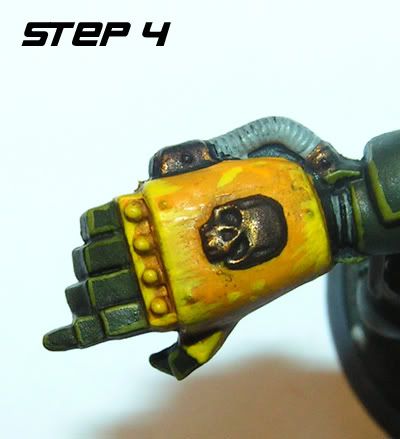
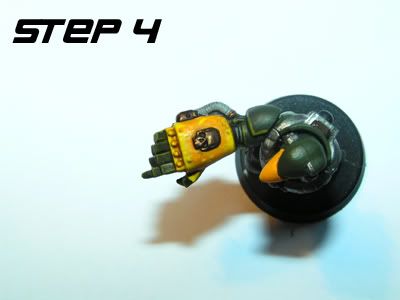
Step 4. first scratch layer
Now we are getting to do some battle damage! The first layer that is… I used sunburst yellow to make the first scratches. This color is lighter then the washed golden yellow on the rest of the powerfist so it will stick out a bit. We are creating the look of the Powerfist very light scratches as if only the very top layer of paint has come off as a result of battle damage. You now have to imagine where you want your battle damage to appear. Again around the edges and raised areas is a good idea because that’s where the chips of paint come off the easiest. Because this is a Powerfist its not hard to imagine where the fist will be most scratched when punching down xenos. I made some small narrow strokes along the line of movement of the fist as this looks the most realistic. Also a few small scratches on the middle of the hand. This will become more clear in the next few steps.


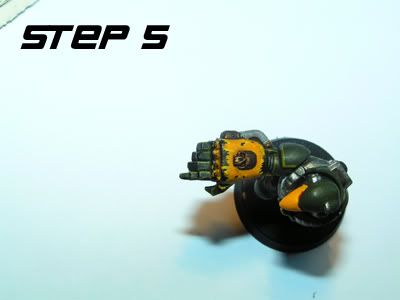
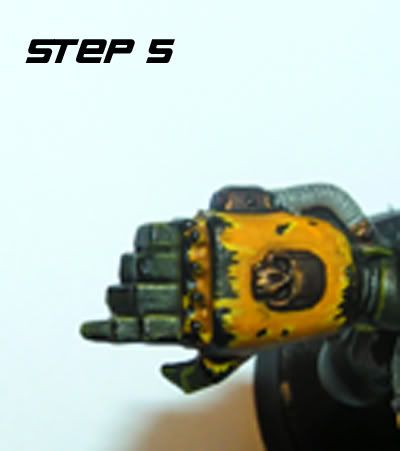
Step 5. Second scratch layer.
This step is basically the same as the last step but now we’ll use chaos black and stay within the area that we just painted with sunburst yellow. Leaving just a fine line of sunburst yellow showing it will create the illusion that this layer is scratched deeper then the last step. As if the model is scratched to the basecoat of the model. The pictures should make this step more clear.


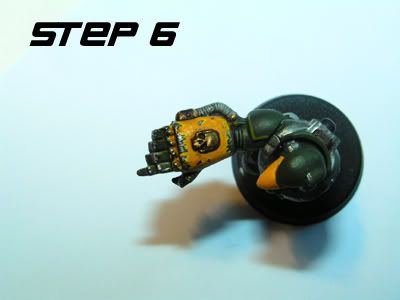
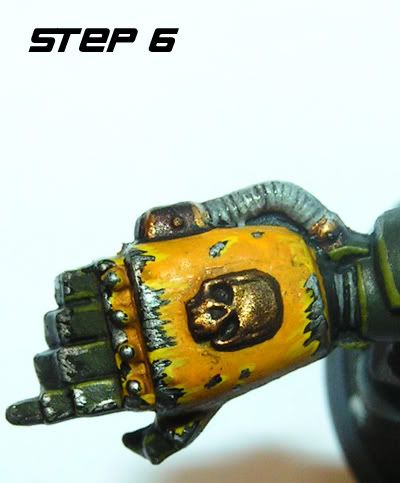
Step 6. Last scratch layer.
It begins to feel like rinse and repeat but this is the step that brings it all together. When you take boltgun metal and do the same as step 4 and step 5, leaving a fine line of the chaos black showing it will seem as if this is the deepest part of the scratch. I also touched up the skull with some burnished gold. Look at the picture of step 6 and it should be clear what I mean here.


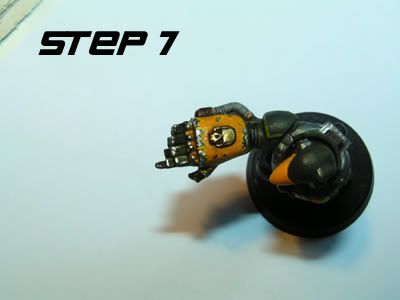
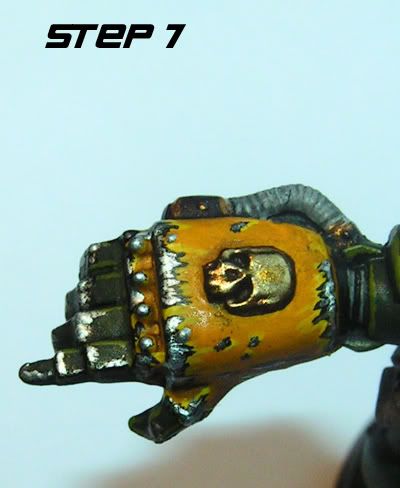
Step 7. Touching up
In the last step I use mithril silver to do some touch ups. I only put very tiny painttips in some places to make it seem these scratches are fresh or recent or that they are scratched more often over and over again. Again it also gives a bit more depth.
I also touched up the skull with a 1:1 mix of mithril silver and burnished gold.
Done!
The result looks quite satisfying to me so I’ll leave it as it is. You might want to experiment with adding a step or two yourself. I sometimes do a layer of very very watered down wash between step 6 and 7.


That's it! i hope you enjoyed this short tutorial. If you have any questions please let me know and leave a comment.

Seb