09/09/2016

Bolt Action V2 Article in WS&S

You've probably heard all about the new Bolt Action rules by now or maybe you've even read the article in the latest WS&S edition... I'm proud and feel honored I was asked to write this article and the biggest plus was I got the rules early. 
The new rules play very nicely and are a lot of fun. I'm looking forward to more games.
This was my very first published article and included pictures of my models and gaming table so I feel very proud. It being my first I can see now where I can improve if I would write another article but I'm very happy with how it turned out.
Make sure you subscribe to this great magazine or download the digital copy:http://www.karwansaraypublishers.com/pw/wss/


Cheers,
Seb

23/07/2016

Dog eat dog world


One of the things in this hobby I really enjoy is the little side projects that tie in with the project you're working on but isn't one of the core models for the game. I have painted a lot of uniforms and a couple of vehicles in the past months so doing something completely different is a welcome change.

Warlord Games Mastiff Packmaster
When I was going through my bitz box and other boxes of unpainted miniatures looking for bits to use for my IED's (see article here) I found a blister of Warlord games' Hail Caesar dogs with a handler which I bought some time ago when I was going to do a Frostgrave project but I completely forgot I had it. Somehow that project never started so I can use the dogs for the Zangali project.

I plan to use them for my own wargaming rules that I'm still working on (slowly). They can have a sort of simplified sentinel role. I see them on a gaming table as guard dogs that patrol an area and can raise the alarm  and/or perform an assault with specific rules for attack dogs. Either way it will be fun to incorporate them in the games and scenarios.

As you can see I painted them up differently from the ones on the Warlord's webshop, I have drawn my inspiration from the dog pictured in the "Gola Park Rangers" article that you might have seen. If not you can find the link here.


04/07/2016

Modifying laser cut MDF scenery


Sarissa precision MDF modified
I love using laser cut MDF buildings. They are relatively cheap, easy to build and plenty to chose from. When I build my WW2 French Normandy table I used 6 4Ground building but more about those at the bottom of this page, this is the zangali blog remember.

For Zangali I have thus far only used Sarissa Precision buildings. I'm using the "Far East" buildings. I have 2 houses, a watch tower and a small radar station. The laser cut buildings come quite plain and are unpainted but they are a nice base to start off with. 


First I add some sand to the bases and then paint all the buildings in various brown tones. You can be a bit messy at this stage, it will even make it more realistic. Once the paint is dry I used some shades of ink and washed the whole model. You can lengthen your ink with a bit of water. Once that was dry I dry brushed the whole thing with some light brown / grey paints. Of course I also painted the base with the same colors as I used for my gaming table to match it. That was basically all the painting I did.
To the tower I made some major changes. I didn't really liked the walls of the original so I cut those out and green stuffed some sand bags. I also painted up a bit of bandage in some camo colors and torn the bottom off to make it look ragged.
All the roofs in this far east set are quite plain and simple and look a bit off to me so I bought a bamboo sweeper at the local pound store and cut some of the bristles off and used that for the roofing. You can see it makes a big difference. If I would do it again I would make it look more like two small layers instead of one big one but hey...


This building has just been re-roofed and painted, nothing major but it makes a big difference


At the start of this article I also said I have used 4Ground buildings in an earlier project and even though it has nothing to do with the Zangali project I do want to show you them here as it is just another example of how you can add your own creativity to a pre painted building. 

4Ground French Garage
The problem I had with the 4ground buildings is that they look really polished, plain and all look the same. Also if you put them on a grass matt like most of us do they look out of place and usually don't fit in with the gaming table.
To tackle those things I did a couple of things. First of all I googled for tiled flooring, carpets and wallpapers, just printed them on paper and glued them inside the rooms. They all look different now but not from the outside so I added some climbing plants to the walls and again printed some posters and such. I didn't go for the war propaganda posters that you often see but tried to make it look like a normal small French country village with a cafe, Garage and a bombed house (although the bomb just missed the house 


The whole thing is on a MDF base, the cobble stones are just textured wall paper and then painted and washed. I added a little shed made of coffee stirring sticks some walls, 2 gas pumps from my son's old garage set and some lose bits and pieces that fit in this setting. And YES, that is Mater from Cars. everybody always asks me that. I did repaint and changed him a bit but somehow he is still recognisable.


For this destroyed house I just put the whole thing on a MDF base again. The wall paper cobble stone is also the same and blends in with my road sections of the gaming table. I just used a Games Workshop crater to create the impact point just next to the building. Even though it missed the following explosion still destroyed most of the house. A direct hit would have destroyed it completely. With all the lose debris sprinkled loosely on the base it creates the feeling of total destruction a a heavy bomb


4Ground destroyed detached house

4Ground French Cafe
And lastly no French village can do without a Café. I can just envision René Artois from "allo allo" there going round with some drinks while planning how to get his hands on the fallen Madonna with the big boobies.
I think you get the idea now of how I made this. I must say that the chairs are from 4Ground also but the tables are made by me.
The last tip I have really is that I flocked the edges of the MDF bases with the same flock as my gaming table so the buildings blend in perfectly


4Ground French Cafe
4Ground French Cafe

Here's a shot of the Normandy table in action:
4Ground Normandy gaming table

Cheers,
Seb

27/06/2016

Toyota Technical .50cal painted (Empress Miniatures)


Eureka Miniatures Toyota Technicals with .50cal
Eureka Miniatures Toyota Technicals with .50cal
I have ordered a couple of Toyota Technicals with a .50cal and gunner from Imaginative Miniatures a couple of weeks ago. The Empress Miniatures Toyota technical can be bought with and without a 50.cal for the same price which is odd but doesn't include a gunner so I bought that additional model as well. The gunner looks a bit middle eastern to me because of the head scarf. But my militia rebels have the eureka Masked Somalis so next to them he doesn't look out of place. And even though he doesn't show much skin the bits that are visible are painted up with a dark brown skin color to make him look African.

Eureka Miniatures Toyota Technicals with .50cal
I have painted the first one white,...well white with a lot of dust and mud and some damage. I wasn't sure about the windows, go safe and paint them black or paint them up in a blue gradient. I chose the latter and like the sky reflection.
I really wanted this to be a "Toyota" and was thinking about painting the letters on the back but that was quite daunting because I can't paint that straight. In the end I just printed the Toyota logo on paper, cut it out, soaked it in watered down PVA glue and stuck it on the back. Then with the sponge technique I weathered the back like the rest of the truck and used pigments for mud.Now you can't tell it's not painted on.

Eureka Miniatures Toyota Technicals with .50cal

And then the Gunner. I didn't want to glue it to the car but I wanted to be able to take it off whenever needed. I cut a small piece of thin plastic card to fit in the back and as you can see in the picture above both options look nice. I 'd like to add some empty shell casings around the gunners feet but I couldn't find my ultra thin plastic string. I might do that later or just with the other Toyota I still have to paint up. I think that one will be painted red, what do you think..?

Cheers,
Seb

22/06/2016

homemade IED (toy)


IED Marker 

Now that the Zangali Army and rebels are done it's about time we have a little game. For the first mission I still miss one little model, more a marker really. Something that can go BOOOOM!!!

Some real I.E.D.'s for inspiration
I have been looking at I.E.D.'s on google for a bit so I hope the CIA will not be knocking on my door. There are a lot of different kinds of IED's hence the name Improvised Explosive Device. I had a look at some pictures of what it should look like and when I saw the very first image that came up I immediately thought of warhammer 40K orks. The shells and mines look just like those and I still have a good few of those. I quickly rummaged through my Bitzbox and found a few suitable pieces I could use.

Watch out! IED ahead!
I simply cut of a few rokkitz for the shells and used a melta bomb as a landmine. I shaved the shells down a bit so they would look a bit sunken into the ground. I then added some small electrical wiring and then added the sand. After that I painted the whole thing up and added some grass tufts.

I pretty pleased with the results and will make a few more. Now I know the whole idea behind an IED is that they are concealed and not spotted easily but for wargaming that doesn't work. Then I could just as well put sand on a 25mm base and say it's an IED marker.

19/06/2016

First Rebel Militia Finished


Eureka Miniatures 28mm Somalis
Now that the Zangali Army infantry is done it's time to start painting their adversaries, The Northern Armed Militia (NAM) a.k.a. The Banga Boys. These are the militia rebels that have joined Lebon Banga in his war against Anan's government. These are the men who want to take their guns all the way from the northern jungle to the capitol in the south, overthrow the government and end Ime Anan's reign.

Rebels with German WW2 Decals....
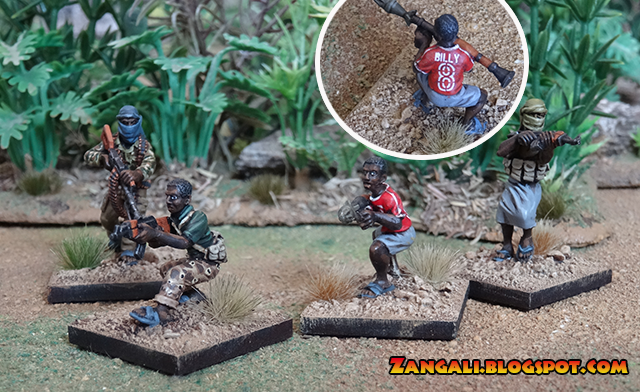
These are the first 11 models I painted up for the militia. They are 28mm Eureka Somalis. Because they are rebels I gave them a variety of colours. I didn't want them to have uniforms or anything, I wanted them to look like armed civilians. I even gave two men a football shirt. I got the idea when I first saw the models and I used some old decals for their shirt numbers and player name. No one will really see these are actually world war 2 German tank numbers will they.

Click to enlarge
It's fun to paint models with more freedom then you get with regular army models. I can mix and match colors whatever I like. I have about 15 more of these models and by mixing the masked and unmasked models you don't really see that there's only a small number of poses available. Soon I will also add some Spectre miniatures to them but more about that later....

15/06/2016

Making Jungle Terrain Tutorial

28mm jungle terrain

When you're making a Jungle themed gaming table it's nice to have some actual jungle pieces. In this topic I'll cover how I make my jungle pieces. I hope to show you how I do it so you can copy this or you can change them to fit your jungle table. I like my jungle to be modular so I can have different set-ups with every time I set up the gaming table.

Cutting the shapes from MDF
Step 1: Get a sheet of 4mm thick MDF and mark out some organic shapes with a marker. Before I drew the shapes I measured out area's of 3"x3", 6"x3", 9"x3" and 6"x6" and drew the shapes in there. You can see it on the picture below. (ignore left side of the picture, those will become mountains and hills for a later tutorial).

Step 2: Cut out the shapes from the MDF Sheet with a jigsaw and cut the sharp edges with a hobby knife. Then sand them down so you get smooth and curved edges.


Tree bark ready for the oven
Step 3: You might want to add some rocks to your jungle.You can get bags of tree bark from the garden store. They are pretty cheap and a large bag will last you a lifetime. Funnily enough the tree bark will look more realistic then using actual rocks and will keep it light in weight. The tree bark is still a bit moist when you take them out of the bag. You can leave them out of the bag for a couple of days to let them dry but I heated up the oven and then put the tree bark in the oven on a baking tray with the oven turned off. The heated oven will dry the tree bark in about half an hour.


Tree bark scrub down!
Step 4: When the tree bark is dry I take a stiff toothbrush and start scrubbing the tree bark. Lots of dust and small bits will come of and the edges will get that realistic rock like appearance. This also prevents the rocks from chipping later on when you have painted them.


Hot glue gun is...HOT!!!
Step 5: Take a hot glue gun and glue the pieces of tree bark down on the bases. Try to work as neat as possible and watch out, hot gue gun is...hot. I got some minor burns from the hot glue dripping from the gun. But if you want good looking scenery some second degree burns are a small price to pay.


Seal the tree bark
Step 6: This is a very important step which should not be skipped. Take some PVA glue and water it down with about 40% water. Now take a brush and coat all the bits of tree bark with a generous splash of the watered down PVA mix. The dry tree bark will soak up the mix and it will make it stronger, prevent it from chipping and makes it easier to paint later on because the tree bark will not soak up your paint. I water the PVA down because the tree bark will soak it up a bit easier but also because you will keep the most detail like this instead of with pure PVA glue.


 disco dip, nuts or sand sir?
Step 7: When the PVA mix on the tree bark is dry we can start to add sand to the bases. I coated the topside of the bases with pure PVA glue and then dumped them into a bucket of sand. Make sure the sand sticks to all the areas and no white parts are showing. Shake off the excess sand and leave them to dry. Also make sure no sand is glued to the underside.


Step 8: It's time to get the jungle bases painted up and plant the trees and plants. When you are making a complete jungle table I suggest using the same color for the jungle terrain pieces as you're using for the gaming table. This will make sure your scenery blends into the table seamlessly. When you do this it's a good idea to go to your local DYI shop and buy a can of cheap matte paint in the desired colour. I bought a can of a sort of light beige sandy colour. You can also do this for your rocks, hills and mountains just make sure you buy a water based paint because it will dry faster, smells less and will not melt any polystyrene you might use in your scenery pieces.


Paint the rocks first. easier that way.
Step 9: Now paint up the rocks with your desired colour. Once dry also wash the rocks and drybrush with the original colour. Now with the rocks you want to create a bit more depth and contrast so use lighter colours and drybrush at least two more times. I used a grey'ish/ brown color and drybrushed it with Vallejo Brown Sand , then Vallejo Iraqui Sand and last Vallejo Ivory. 


Washing the jungle bases
Step 10: Make a wash of a brownish colour, for scenery pieces I just pick a colour I want to use and then add a load of water to it to thin it creating a cheap and easy wash. For scenery pieces like these it's not really rocket science. When the wash is dry I drybrush the pieces with the original colour to create a bit of depth.


Starting to look like a jungle
Step 11: Now the painting is done and dry it's time to get creative with some plastic (aquarium) plants and model trees and foliage. A cheap and good place to buy these is Ebay where you can get quite a variety. Start with the larger pieces and work to smaller pieces. Just place them in a irregular pattern. I use a hot glue gun and super glue for this.


 Step 12: Some plastic plants might look a bit too much like toy trees. Ad some different colours of green and brown with an airbrush if you have one but you can also use a drybrush technique to create depth. I also removed most of the obvious moldlines and flash but this can be a bit of a tedious job... I finish this step by spraying some matte varnish over the plants and trees to take of the plastic/shiny look. Unfortunately I don't have a picture of this to show you the difference but if you compare the picture from the last step with the picture from the next step you will see I have painted the palm trees up, added some green variety to the plain green leaves and gave it a matte coat of varnish to take the shine off.


Painted and matte coated
Step 13: Now it's time to add the last bit to your jungle bases. I have added some small green flock here and there and for the fallen leaf effect I used a kitchen mix of Italian herbs. Very cheap and you can get a lot of different kinds. At first it is kind of smelly but that will go after about a week. I have also added some grass tufts. I have bought these from Gamers Grass, great service, good product and good variety of colors, shapes and sizes. I mix up the tufts and then I'm done. ready to use on your gaming table.


Jungle base done

With some figures for reference