Showing posts with label battle dammage. Show all posts

01/12/2011

Ork Battlewagon WIP 3


My battlewagon is nearing it's completion. Yesterday I finished the overall battle damage. It might seem pretty straight forward but it was really time consuming. I'm really happy how it turned out although I'm still a bit bummed about the army painter primer. It's obscuring details because it's on too thick.
After I took this picture I realised I still need to paint the glyphs on the door and I want to add some more details on it by making a flagpole where the periscope should go and I want some trophy's dangling from the sides. More pictures to come later.

For now I'm calling it and I'm back on infantry models again.


Cheers,
Seb

07/11/2011

Ork Battlewagon WIP 1

Ork Battlewagon WIP
Two weeks ago I finally got my shipment in from Maelstorm. I had placed an order for an Ork Battlewagon and I had to wait 3 weeks for it to arive. In those three weeks I had plenty of time to think about what kind of color scheme I would paint it and what it should like like. I decided on an all Yellow Battlewogon but with loads of rust and battle damage.

I'm painting the wagon in stages because it's easier to handle and paint that way. I've assembled it so that I can take everything of if I decide to go "open topped" or full armour with battle canon.I can take everything off and change it to fit the specifications on my army roster.

I have also added some armour plating above the rear big shoota's to give them some more protection. I just think it looks better this way instead of the big gaping holes in the sides and top.

As you can see some parts are still in the armypainter yellow undercoat and some part are already painted. It was the first time I used an army painter colored primer and probably the last. Yellow is a hard color to paint and the primer didn't cover properly in some areas and was too thick in other areas. I went over with a can from the DIY store and painted lyanden foundation over that and finished it off with a layer of watered down golden yellow before I started the weathering.

Still need to do the Tusks.....

The reinforced ram will probably not get used a lot because I want to go for a "deff rolla" but it was great fun painting it up. The bad moon icon on the front was done "free hand".


Cheers,
Seb

06/04/2011

Ork Warboss Skrapsmacka

AoBR Ork Warboss
I just finished the AoBR Warboss. If you follow my blog you might know that I was working on the Assault on Black Reach Warboss and you would have seen wip pictures of him. If not and you want to have a look at the earlier stages then have a look here and here.

I think the conversion of the chainsaw in the Powerklaw worked really well. I also added a chainsaw blade to the gun to make it more menacing.

I think he will look like a Proppa Boss in my Ork army, what do you think? let me know in the comments below.

Seb

14/02/2011

A Nob well done

Last week I hardly got any painting done. I wanted to get the hazzard stripes done on my drop pod because I found a nice tutorial on the FTW site....But didn't get round to it. I didn't even get to put up a "Fantasy Friday"post here on my blog. I simply had a ton of work to do and ran out of time.I did however start up a new project. I want to paint up my Space Marine Army and get it over and done with so I assembled the last assault squad and started pinning them to their base. I'll put the pics up when I get some done.

Click to enlarge
But I also did manage to finish the first Ork Nob. You might remember seeing him in WIP 5 and now I got to finish it. I tried out an Ork skin tone of my own. Unfortunately in the picture the skintone comes out pretty flat even though it has about 5 layers of highlights and some washes. I think I realy need a lightbox.

Anyway, I really like how he turned out. The idea for the army is yellow armour and lots of rust. It also has a lot of chipped armour like I explained in my "Battle damage tutorial". The only thing I never though of is how the hell is he ever going to get that spare gun on his back with his power klaw.!?!

Seb

09/01/2011

Mini Showcase: Dreadnought


Click to enlarge

One of my first  40k "vehicles" to paint was the Space Marine Dreadnought. I like these little robotic fellas. I love painting them because they heave loads of little different areas and plenty of detail. I also love fielding them in battle, they are a jack of all trade unit and very versatile with all the different weapon lay-out possibilities. In these pictures you see my "close combat dread" as I like to call him. Eventhough  I can swap all the waeapons and change them I like to keep this dread the way it is. It has the assault cannon, flamer and close combat arm so it can really rip enemy units apart from a short distance. Therefor I like to stick them into a droppod and drop it close to or even behind the enemy lines. My opponent usually looks in horror when I land the pod and this beast walks out just a few inches away from his units.

I have another dreadnought which I use for distanced attacks with missile pod and twinlinked lascannon.


Seb


30/12/2010

Painting battle damage

Here's the Step by Step guide on how to paint battle damage.

I picked an assault marine because I gave it a yellow powerfist and it’s easier to take clear pictures of that rather then of the catachan green I use a lot on my chapter.
These are the colors I used:

Catachan green
Camo green
Golden yellow
Sunburst yellow
Tin bitz
Shining gold
Burnished gold
Boltgun metal
Mithril silver
Chaos black
Fortress grey
Badab black

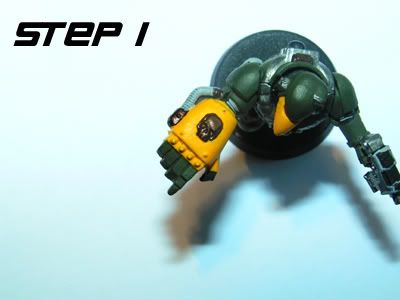
Step 1. Basepainting
This is what I call Basepainting, I paint the model in the basic colors of my chapter. If you take your time you can paint up the model nice and smooth. Make sure your paint is watered down a bit because it paints nicer and easier and looks a lot better. No one likes a lumpy model unless its nurgle.
The base colors I use are
Fingers and arm: Catachan green
Hand : Sunburst yellow
Skull: Tinbitz
Hose: Fortress Grey
We will just concentrate on the powerfist so I only describe what I do Step by Step on that leaving out the rest of the model.
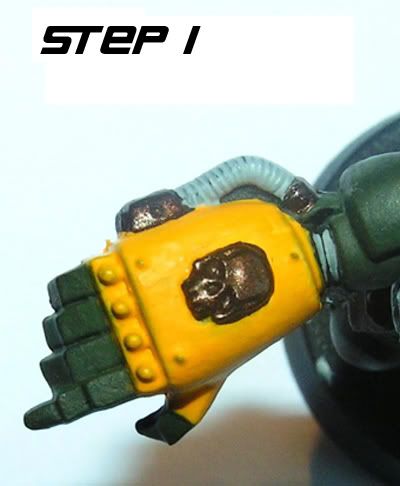


Step 2. Edging
When you want to give your model a bit of depth the easiest way to do so is by edging it. Just paint really fine lines along the edges in a lighter color then the original base color.
I used:
Fingers: Camo green
Hand: Sunburst yellow
Skull and hoseconnectors Shining gold
Thin down your paints again and lightly edge the model. The skull was done with very watered down shining gold on the raised parts only.
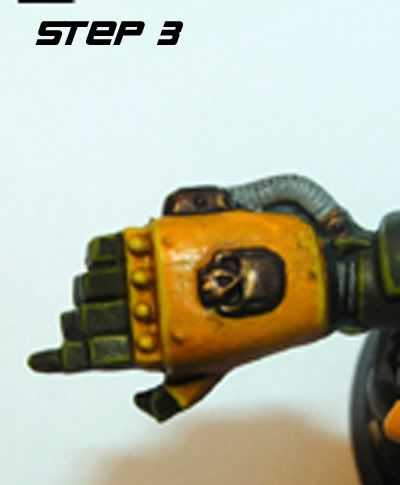
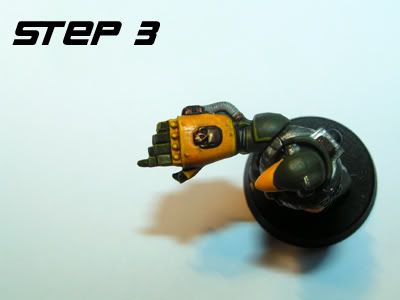


Step 3. Washing
Next I washed the complete Powerfist with watered down badab black (1:1) . This will give the model even more depth and creates the illusion of shadow. There’s nothing to it, just wash it and make sure it doesn’t pool. Don’t over do it and you’re good.


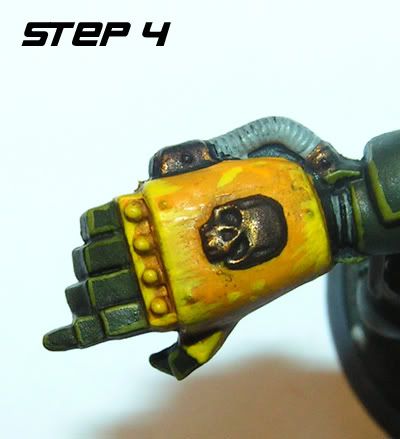
Step 4. first scratch layer
Now we are getting to do some battle damage! The first layer that is… I used sunburst yellow to make the first scratches. This color is lighter then the washed golden yellow on the rest of the powerfist so it will stick out a bit. We are creating the look of the Powerfist very light scratches as if only the very top layer of paint has come off as a result of battle damage. You now have to imagine where you want your battle damage to appear. Again around the edges and raised areas is a good idea because that’s where the chips of paint come off the easiest. Because this is a Powerfist its not hard to imagine where the fist will be most scratched when punching down xenos. I made some small narrow strokes along the line of movement of the fist as this looks the most realistic. Also a few small scratches on the middle of the hand. This will become more clear in the next few steps.


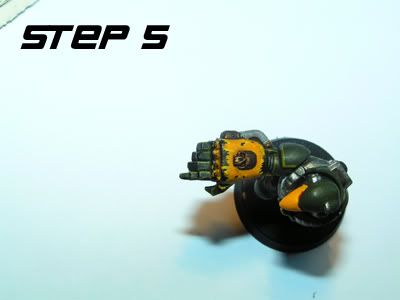
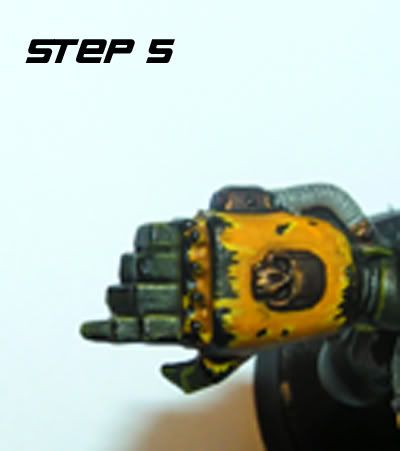
Step 5. Second scratch layer.
This step is basically the same as the last step but now we’ll use chaos black and stay within the area that we just painted with sunburst yellow. Leaving just a fine line of sunburst yellow showing it will create the illusion that this layer is scratched deeper then the last step. As if the model is scratched to the basecoat of the model. The pictures should make this step more clear.


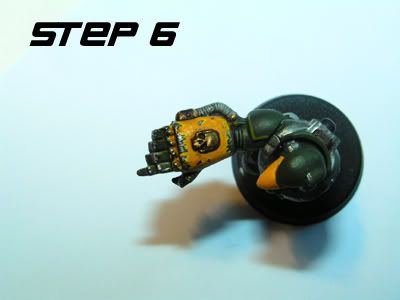
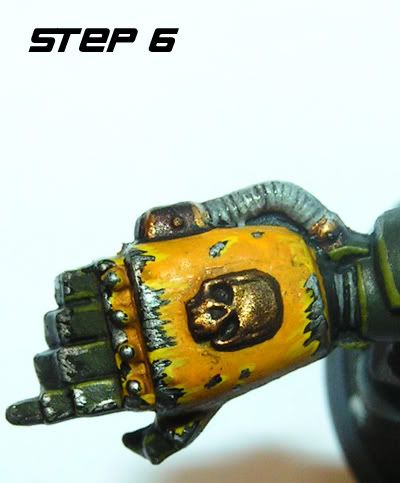
Step 6. Last scratch layer.
It begins to feel like rinse and repeat but this is the step that brings it all together. When you take boltgun metal and do the same as step 4 and step 5, leaving a fine line of the chaos black showing it will seem as if this is the deepest part of the scratch. I also touched up the skull with some burnished gold. Look at the picture of step 6 and it should be clear what I mean here.
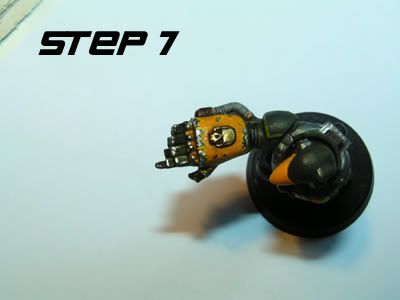
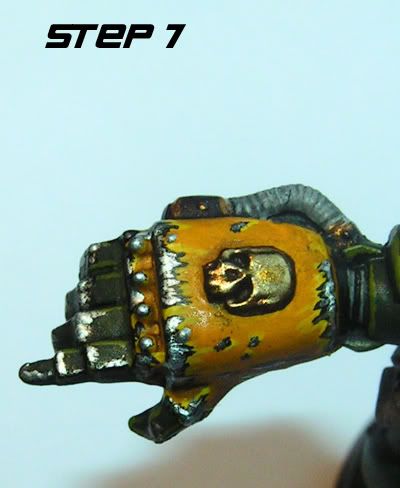


Step 7. Touching up
In the last step I use mithril silver to do some touch ups. I only put very tiny painttips in some places to make it seem these scratches are fresh or recent or that they are scratched more often over and over again. Again it also gives a bit more depth.
I also touched up the skull with a 1:1 mix of mithril silver and burnished gold.
Done!
The result looks quite satisfying to me so I’ll leave it as it is. You might want to experiment with adding a step or two yourself. I sometimes do a layer of very very watered down wash between step 6 and 7.


That's it! i hope you enjoyed this short tutorial. If you have any questions please let me know and leave a comment.

Seb