I love using laser cut MDF buildings. They are relatively cheap, easy to build and plenty to chose from. When I build my WW2 French Normandy table I used 6 4Ground building but more about those at the bottom of this page, this is the zangali blog remember.
For Zangali I have thus far only used
Sarissa Precision buildings. I'm using the
"Far East" buildings. I have 2 houses, a watch tower and a small radar station. The laser cut buildings come quite plain and are unpainted but they are a nice base to start off with.

First I add some sand to the bases and then paint all the buildings in various brown tones. You can be a bit messy at this stage, it will even make it more realistic. Once the paint is dry I used some shades of ink and washed the whole model. You can lengthen your ink with a bit of water. Once that was dry I dry brushed the whole thing with some light brown / grey paints. Of course I also painted the base with the same colors as I used for my gaming table to match it. That was basically all the painting I did.
To the tower I made some major changes. I didn't really liked the walls of the original so I cut those out and green stuffed some sand bags. I also painted up a bit of bandage in some camo colors and torn the bottom off to make it look ragged.
All the roofs in this far east set are quite plain and simple and look a bit off to me so I bought a bamboo sweeper at the local pound store and cut some of the bristles off and used that for the roofing. You can see it makes a big difference. If I would do it again I would make it look more like two small layers instead of one big one but hey...
This building has just been re-roofed and painted, nothing major but it makes a big difference
At the start of this article I also said I have used 4Ground buildings in an earlier project and even though it has nothing to do with the Zangali project I do want to show you them here as it is just another example of how you can add your own creativity to a pre painted building.
 |
| 4Ground French Garage |
The problem I had with the
4ground buildings is that they look really polished, plain and all look the same. Also if you put them on a grass matt like most of us do they look out of place and usually don't fit in with the gaming table.
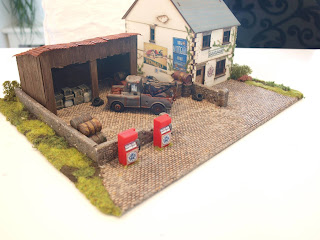
To tackle those things I did a couple of things. First of all I googled for tiled flooring, carpets and wallpapers, just printed them on paper and glued them inside the rooms. They all look different now but not from the outside so I added some climbing plants to the walls and again printed some posters and such. I didn't go for the war propaganda posters that you often see but tried to make it look like a normal small French country village with a cafe, Garage and a bombed house (although the bomb just missed the house
The whole thing is on a MDF base, the cobble stones are just textured wall paper and then painted and washed. I added a little shed made of coffee stirring sticks some walls, 2 gas pumps from my son's old garage set and some lose bits and pieces that fit in this setting. And YES, that is
Mater from Cars. everybody always asks me that. I did repaint and changed him a bit but somehow he is still recognisable.
For this destroyed house I just put the whole thing on a MDF base again. The wall paper cobble stone is also the same and blends in with my road sections of the gaming table. I just used a Games Workshop crater to create the impact point just next to the building. Even though it missed the following explosion still destroyed most of the house. A direct hit would have destroyed it completely. With all the lose debris sprinkled loosely on the base it creates the feeling of total destruction a a heavy bomb
 |
| 4Ground destroyed detached house |
I think you get the idea now of how I made this. I must say that the chairs are from 4Ground also but the tables are made by me.
The last tip I have really is that I flocked the edges of the MDF bases with the same flock as my gaming table so the buildings blend in perfectly
 |
| 4Ground French Cafe |
Here's a shot of the Normandy table in action:
 |
| 4Ground Normandy gaming table |
Cheers,
Seb


