

09/05/2012

13/03/2012
Your views on my 1750 BA list?

The main reason for this is that I only have 1 predator but a lot of infantry models. A mech army isn't my play style either, I like to move around with my packs of jumpers and move in for the CC.
Here's my list let me know what you think:
250-Mephiston
125-Librarian with jump pack (Blood Lance & Shield of sanguinius)
150-2x sanguinary priest with Jump packs
250-10 men jp Assault sqd. 2x meltagun, Sgt, with powerfist and infernuspistol
250-10 men jp Assault sqd. 2x meltagun, Sgt, with powerfist and infernuspistol
250-10 men jp Assault sqd. 2x meltagun, Sgt, with powerfist and infernuspistol
90- 5 men scouts 4x sniper rifle 1x missile launcher, Sgt with meltabombs
200-Furioso dreadnought 2x blood talons, 1x heavy flamer 1x meltagun, extra armour magna grapple, Drop pod
185-Furioso dreadnought 1x blood fist with 1x heavy flamer,1x frag canon , extra armour, Drop pod
Total: 1750 points
The reason I made this a 1750 points list is because in my region everywhere I go it's a 1750 tournament.
If you have any suggestions then please let me know but as I said I don't have a lot of (Baal) predators or vindicators.
Cheers,
Seb
03/03/2012
Bought a New Airbrush


-I want my airbrush to be quiet because my game/hobby room is in the attic and running an air hose to my garage would be too long.
-I want an airbrush with a tank to minimise moisture and keep a constant airflow.
-I want to be able to airbrush large areas like base coating or terrain.
-I want to be able to airbrush small details.
-I don't really need to be able to airbrush very very fine lines.
-I don't want to spend more then €150 ($200)
The Black Bull Starterset meets all these criteria so I ordered one that came in yesterday. I have set it up and turned on and it was even more quiet then I anticipated and the pressure regulator works great. I still have to try out the pistol but from what I can see it will be a joy to start experimenting with. Bring on the batch painting....!
Here's the specs:
Airbrush compressor Black Bull BC23MT3 with 3 liter(0,8 Gal) airtank:* Oil free piston compressor with switch off
* Airflow max. 23 liter / minute (6.1 Gal)* Max Pressure 4 bar (55 PSI)
* Incl. airfilter, pressure gauge and pressure regulator
* Voltage 220-240 Volt / 50 Hz
* Motor 1450 rpm
* Noise 47 dB
* Weight 5,2 kg (11,5 pounds)
* Size 310 x 130 x 310 mm

Airbrushpistol Black Bull 35F Double action:* Needle / nozzle 0,2 mm
* Extra needle/nozzle 0,3 en 0,5 mm
* Black Bull anti condens airbrushshose 1/8 - 1/8
* 2cc paint cup
* Gewicht: ca 60 gr
Cheers,
Seb
01/03/2012
Salt chipped Manufactorum
Last Christmas I got two sets of the games workshop 40K Manufactorum. Having two sets is great because I can make a good sized building or rather ruin with it. I want to make 3 single corner pieces that can fit together or can be used as 3 single ruins. I plan to glue them down on a piece of MDF and add some debris here and there.
 I also wanted to try a new technique I saw on the internet. It's called salt chipping and it's handy to create a weathered look for your buildings or vehicles. If you are not familiar with this technique then I suggest you watch THIS video by Girl Painting where it is explained quite clearly. (it is an actual remake of a video done by MassiveVoodoo but they did it in German)
The technique on it self is quite simple and gives a stunning result. much better then doing it by brush or sponge. It's just a bit more work. I might do a tutorial on it myself when I'm going to do the next bit of Manufactorum.

As you can see I added some "motivational" posters to the walls for added realism. Quite fun to do and I like how it turned out. I just made these little banners on my pc with photoshop but on this scale I think even MsPaint would work. I scaled them to size and printed them on normal paper. then cut them to the right size and soaked them in some gryphonne sepia wash and stuck them on the wall without any glue or anything. Then I torn a bit of the edges and folded some corners as if the poster had been hanging there for many many years.

In the end I think I have got a pretty decent manufactorum ruin but as I said this is only 50% of the work because I'm going to glue them on some MDF and make the floor and add some debris. I will keep you posted.
Cheers,
Seb


The technique on it self is quite simple and gives a stunning result. much better then doing it by brush or sponge. It's just a bit more work. I might do a tutorial on it myself when I'm going to do the next bit of Manufactorum.

As you can see I added some "motivational" posters to the walls for added realism. Quite fun to do and I like how it turned out. I just made these little banners on my pc with photoshop but on this scale I think even MsPaint would work. I scaled them to size and printed them on normal paper. then cut them to the right size and soaked them in some gryphonne sepia wash and stuck them on the wall without any glue or anything. Then I torn a bit of the edges and folded some corners as if the poster had been hanging there for many many years.

In the end I think I have got a pretty decent manufactorum ruin but as I said this is only 50% of the work because I'm going to glue them on some MDF and make the floor and add some debris. I will keep you posted.
Cheers,
Seb
14/02/2012
Happy birthday 40K!
I hardly ever put anything from GW directly on my blog but for this special occasion I thought I'd make an exception.It's GW's 40K 25th anniversary so hip hip hoorah! This is the video for the new special collector's edition Crimson Fist model.
Games Workshop's 40K universe has been with us for 25 years. Some hobbyists might even remember the first rulebook. I myself have been enjoying this hobby since 2008 so that's not even that long. I do however plan on enjoying this hobby for many years to come...
Cheers,
Seb
Games Workshop's 40K universe has been with us for 25 years. Some hobbyists might even remember the first rulebook. I myself have been enjoying this hobby since 2008 so that's not even that long. I do however plan on enjoying this hobby for many years to come...
Happy birthday 40K!!
Cheers,
Seb
02/02/2012
Recycling GW Miniatures
 I have been thinking about it a lot and I have been looking on the interwebs for information "how to" do it but now just recently I took the plunge and finally started recycling my painted Space Marines. I have painted up these models about 3 years ago and some of you might have seen my models here on my blog. They look alright but they don´t really `Pop!` on the gaming table. Also I always play them as vanilla marines and I have bought the Blood Angels codex to see what that was all about and now I want my own BA army.
 I have plenty of marines to make a good start although some conversion work is needed, the biggest challenge however was that my models are all painted up and I want to strip them of their paint job and get a nice clean model to start over again. On the internet you can find loads of topics on this so I started reading about brake fluid,nailpolish remover and all sorts of cleaning liquids. The problem was most of the named brands weren´t available here in the Netherlands. I did find one topic in dutch on a product I know they sell in my local supermarket, it is called `Blue Wonder`. The name on itself sounds very promising so I bought a bottle and tried it on 5 SM Terminators from the assault on black reach set.
So this is how I did it:
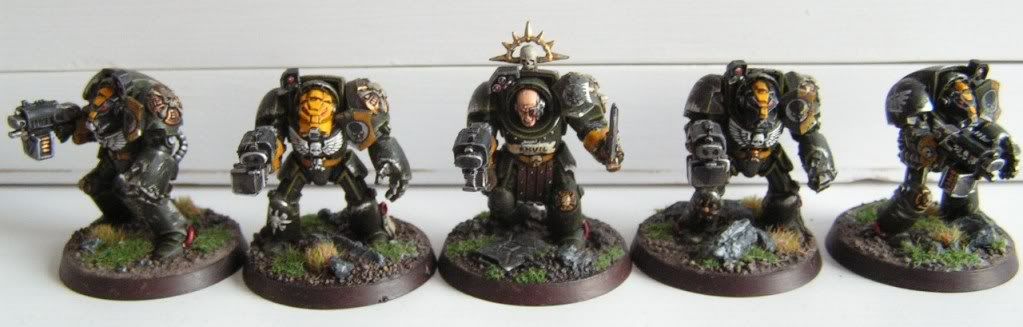
I started off with a test batch and decided my AoBR terminators would be the best to try it on. They have the best armour ,right? no seriously, I think they won't be used much in my future BA lists so I might as well try this product on them and don't have to worry about Melting space marines..
Here is a pic of the "blue Wonder" stuff with all the dutch writing on it. Apparently it will make everything shine and new and will degrease everything, It will clean everything effortless in one go. WOW this is pure gold in a bottle. It also says it is 4x more concentrated. "Concentrated 4x more then what it doesn't say,.... water maybe??
I just put the terminators in the plastic cup and added just enough of "Blue Wonder" to drown them all. I then let them soak for about 24 hours and got a toothbrush to brush the old paint job off. And it worked! A lot of the paint did come off effortless and only the layer of primer stayed on the model. Only in some areas where I used foundation paint and where the paint filled in narrow gaps it was a bit harder to get everything off. I put them back in the "Blue Wonder" for another day and then picked off most paint with a toothpick to reveal the smallest details. However not all of the paint cam off but it is certainly good enough to paint over again, just don't expect Golden Daemon level.
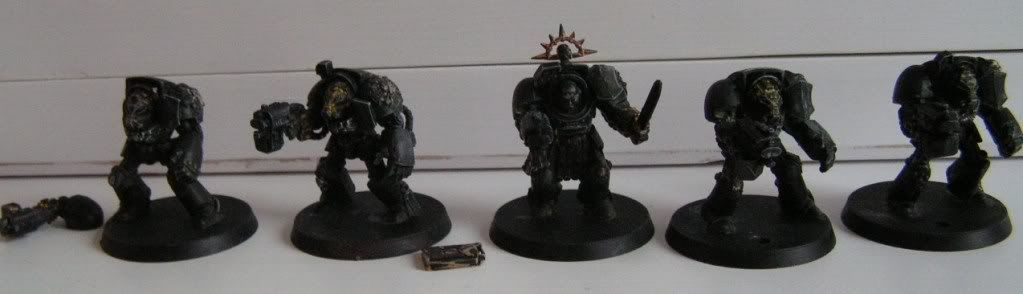 |
| Stripped Terminators |
Any of you guys have a "Wonder"product of your own then please tell me because I want to try different options.
Cheers,
Seb
01/12/2011
Ork Battlewagon WIP 3
 My battlewagon is nearing it's completion. Yesterday I finished the overall battle damage. It might seem pretty straight forward but it was really time consuming. I'm really happy how it turned out although I'm still a bit bummed about the army painter primer. It's obscuring details because it's on too thick.
After I took this picture I realised I still need to paint the glyphs on the door and I want to add some more details on it by making a flagpole where the periscope should go and I want some trophy's dangling from the sides. More pictures to come later.
For now I'm calling it and I'm back on infantry models again.

Cheers,
Seb

After I took this picture I realised I still need to paint the glyphs on the door and I want to add some more details on it by making a flagpole where the periscope should go and I want some trophy's dangling from the sides. More pictures to come later.
For now I'm calling it and I'm back on infantry models again.

Cheers,
Seb
Subscribe to:
Posts (Atom)